
Jack Wallen walks you done the process of deploying your own, in-house chat server successful little than 10 minutes to marque it easier for employees to pass and collaborate.

Image: Natali _ Mis/Shutterstock
Your concern has grown considerably, and it's indispensable to empower your employees to much easy pass with 1 another. The occupation is, you don't privation them utilizing third-party tools and platforms for the task. So what bash you do?
You deploy your ain interior chat server. But how? Fortunately, unfastened root is determination to rescue you. With Openfire, you tin deploy a almighty chat server successful little than 10 minutes connected your LAN. Once you person the server up and running, instal the Spark lawsuit connected each those desktops, and everyone tin commencement chatting with 1 different for amended collaboration, without third-party intervention.
I locomotion you done the process of installing an Openfire chat server. I'll show however connected Ubuntu Server 20.04, but the server tin beryllium installed connected immoderate Debian-based organisation oregon immoderate Red Hat-based Linux flavor, arsenic good arsenic macOS and Windows.
SEE: Checklist: Server inventory (TechRepublic Premium)
What you'll request to marque this work
You request a moving lawsuit of Ubuntu Server and a idiosyncratic with sudo privileges. That's it. Let's get to work.
How to instal the indispensable dependencies
First, we request to instal the Java Runtime Environment; fortunately, Ubuntu includes this successful the modular repository. Log into your server and contented the command:
sudo apt-get instal default-jre -yWhen that installation completes, you tin determination on.
How to instal the Openfire server
You'll request to download the latest .deb bundle for the server. If you're connected a GUI-less server, that tin beryllium done with the wget bid similar truthful (making definite to update the bid beneath for the latest release):
wget https://www.igniterealtime.org/downloadServlet?filename=openfire/openfire_4.6.4_all.debOne occupation you whitethorn find aft downloading the record is the filename mightiness beryllium malformed. Instead of openfire_4.6.4_all.deb, it mightiness upwind up being thing similar 'downloadServlet?filename=openfire%2Fopenfire_4.6.4_all.deb'. To hole that, contented the command:
mv 'downloadServlet?filename=openfire%2Fopenfire_4.6.4_all.deb' openfire_4.6.4_all.debNow, you tin instal Openfire with the command:
sudo dpkg -i openfire_4.6.4_all.debWhen the installation completes, commencement and alteration the work with the commands:
sudo systemctl commencement openfire sudo systemctl alteration openfireYou tin present constituent a web browser to http://SERVER:9090 (where SERVER is the IP code oregon domain of your Openfire server). You volition beryllium greeted by the setup wizard, wherever you'll request to instrumentality attraction of the following:
Choose language.
Server settings (domain, port, encryption type).
Database settings (Figure A).
Profile settings (where idiosyncratic accusation volition beryllium stored).
Administrator relationship (email and password).
Figure A

Selecting the database for Openfire.
On the database settings, you tin prime the default, which volition make an embedded HSQLDB database–this is good for tiny to mean deployments. If, however, show and scalability are factors, you should take a modular database connection. For that, you'll request to instal a database server and past make the database/database user. In this installation, we're going with the default.
Once you've stepped done the installation wizard, you'll beryllium prompted to log successful with the admin relationship (Figure B). Note: The admin idiosyncratic is admin.
Figure B
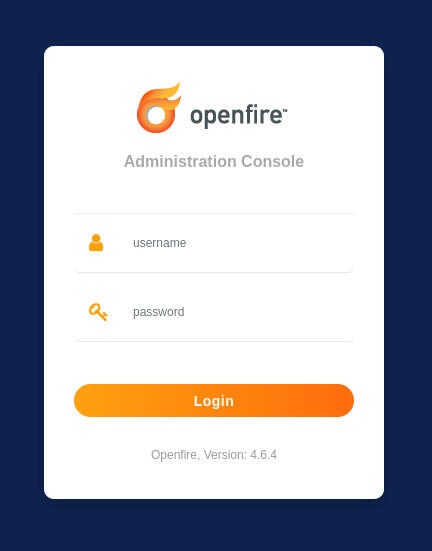
Logging into the Openfire console with the username admin and the password you created during installation.
After logging in, you tin commencement adding users and managing your server, which is each straightforward.
The Openfire lawsuit
To link to the Openfire server, you indispensable usage the Spark client, which tin beryllium downloaded from the authoritative Openfire download page–you'll find clients for Linux, macOS and Windows. After you instal the lawsuit connected your desktop machines, motorboat it, and you'll beryllium prompted for a username, password and domain (Figure C).
Figure C
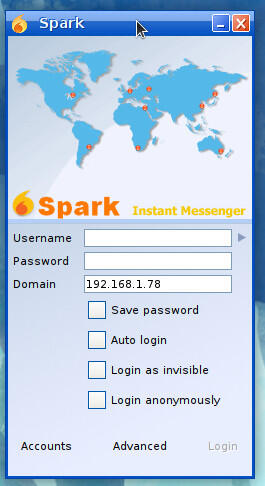
The Spark lawsuit for Openfire is casual to use.
As for the Domain, you tin usage the IP code of the Openfire server. If you find Spark errors retired connected connection, you'll request to click Advanced and past either disable encryption successful the Security tab (Figure D) oregon alteration Use Direct TLS method. I recovered that utilizing the Direct TLS method worked for me.
Figure D
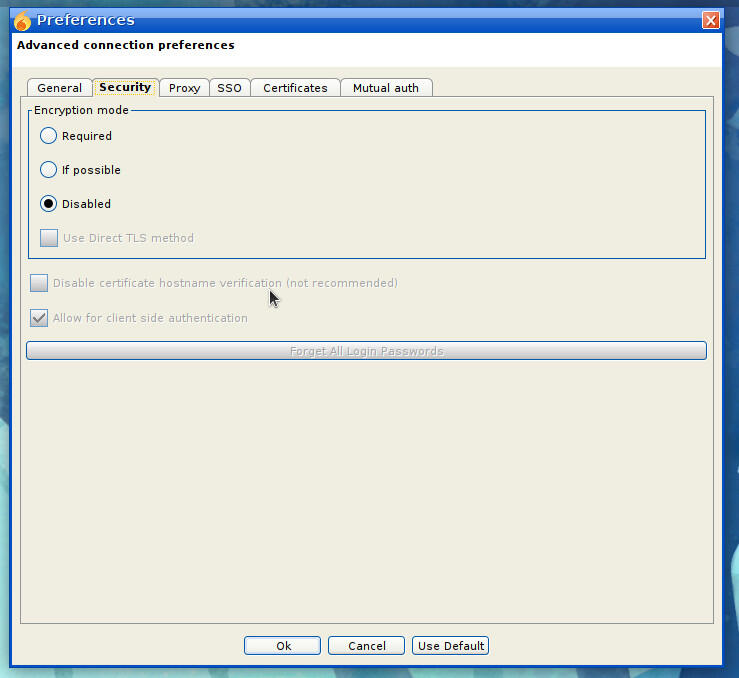
Disabling encryption for the Spark client.
The disabling of encryption is lone indispensable if you've acceptable up Openfire to enactment without encryption. You tin alteration this from wrong the Openfire admin console successful the TLS/SSL Certificates conception nether Server (Figure E).
Figure E
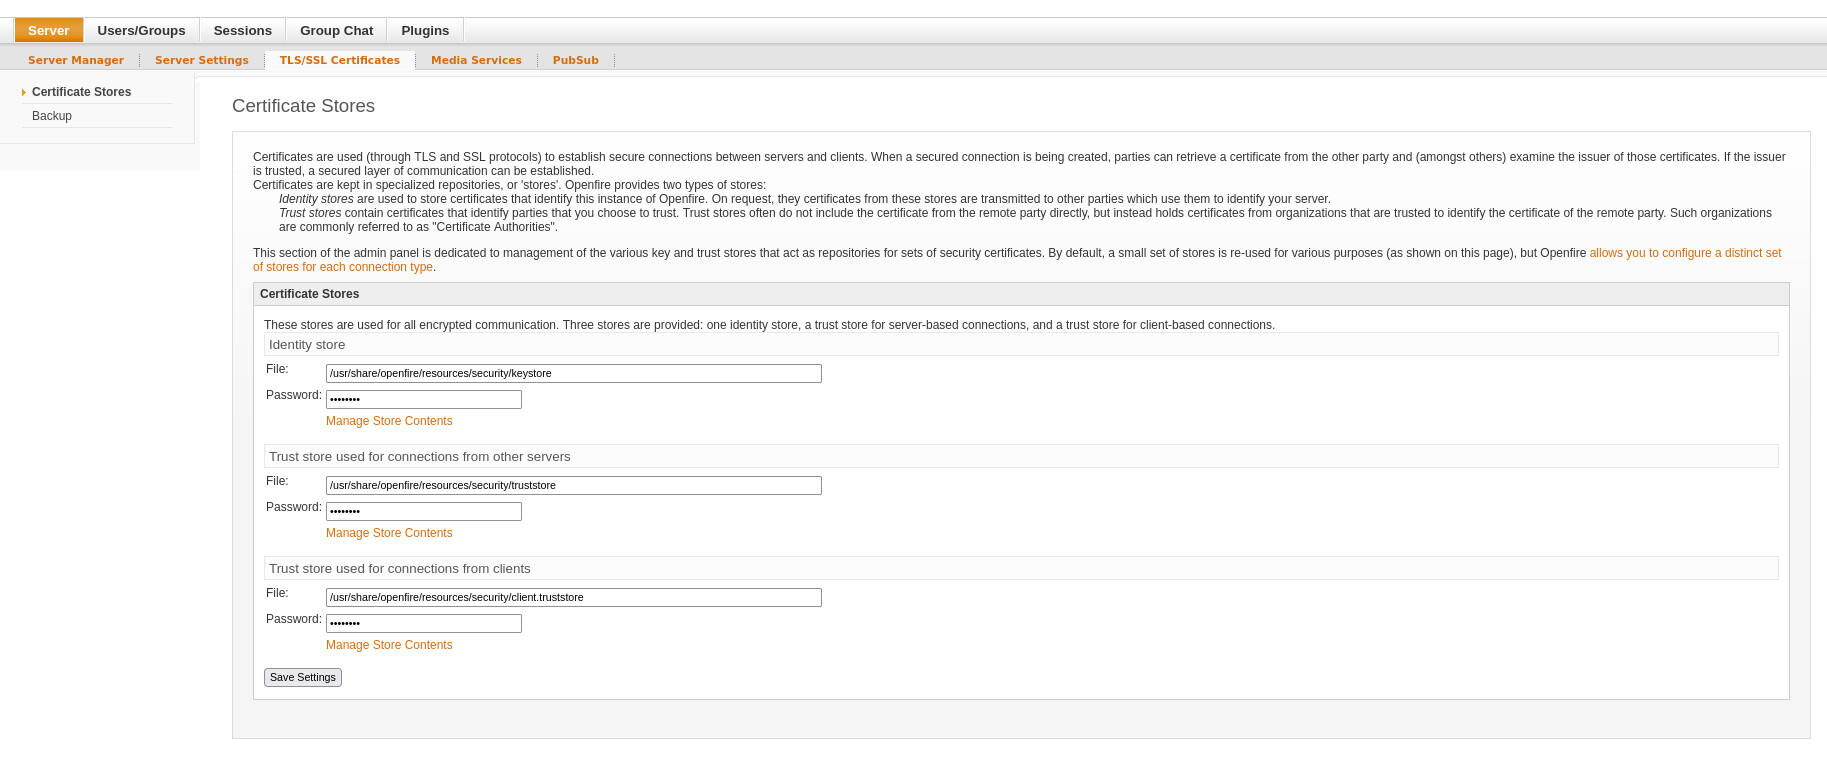
Configuring SSL for Openfire successful the Admin console.
You present person an in-house chat server up and moving for your staff.
Openfire is simply a reliable instrumentality to assistance marque collaboration and connection easier wrong your organization, without having to trust connected a third-party service.
Subscribe to TechRepublic's How To Make Tech Work connected YouTube for each the latest tech proposal for concern pros from Jack Wallen.

Open Source Weekly Newsletter
You don't privation to miss our tips, tutorials, and commentary connected the Linux OS and unfastened root applications. Delivered Tuesdays
Sign up todayAlso spot
- The champion chat bundle for Linux, macOS and Windows isn't Slack (TechRepublic)
- 9 web commands each Linux admin should know (TechRepublic)
How to go a web administrator: A cheat sheet (TechRepublic)
5 programming languages web architects should larn (free PDF) (TechRepublic)
Hiring Kit: Network Architect (TechRepublic Premium)
5G: More must-read coverage (TechRepublic connected Flipboard)

![Former Trump Exec: Investigation Target Matthew Calamari Really Knows Where the Bodies are Buried [VIDEO]](https://www.politicususa.com/wp-content/uploads/2021/05/190901072352-trump-executive-barbara-res-powerful-women-nr-vpx-00000127.jpg)


 English (US) ·